Home » Operating System (Page 2)

Category Archives: Operating System

Address

Jl. Meranti Wing 22 Level 4
Kampus IPB Darmaga
Bogor 16680, Jawa Barat, Indonesia
Tlp./Fax +62 (251) 8624535

Hours
Monday—Friday: 08:00–16:00

KMS Client Setup Keys

slmgr /ipk <setup key>

slmgr -skms

slmgr -ato

Windows 10 Pro W269N-WFGWX-YVC9B-4J6C9-T83GX
Operating system edition KMS Client Setup Key
Windows Server 2012 R2 Server Standard D2N9P-3P6X9-2R39C-7RTCD-MDVJX
Windows Server 2012 R2 Datacenter W3GGN-FT8W3-Y4M27-J84CP-Q3VJ9
Windows Server 2012 R2 Essentials KNC87-3J2TX-XB4WP-VCPJV-M4FWM
Windows 7 Professional FJ82H-XT6CR-J8D7P-XQJJ2-GPDD4

Source: https://docs.microsoft.com/en-us/windows-server/get-started/kmsclientkeys

WiFi USB Adapter Drivers (OSX/Mac, Linux, and Windows)

These drivers were provided to me specifically for this product:
1200Mbps USB Wifi Adapter YOTECE Wireless Dual Band (2.4G/300Mbps+5G/867Mbps) Network wifi 3.0 Antenna Dongle Adapter for WIN 7 /8 / 8.1 /10 Mac OS X 10.7-10.12.4

They will work with Realtek based USB wifi adapters – which is most of the devices on the market.

A note for linux users: More recent versions of Linux (Linux 18, Ubuntu 16) may have trouble using the provided driver. For Ubuntu users, the set of commands below has lead others to successful use of the adapter. Other linux users, please share your successes or problems with the driver.
sudo apt purge rtl8812au-dkms
sudo apt install git
git clone https://github.com/gnab/rtl8812au.git
sudo cp -r rtl8812au /usr/src/rtl8812au-4.2.2
sudo dkms add -m rtl8812au -v 4.2.2
sudo dkms build -m rtl8812au -v 4.2.2
sudo dkms install -m rtl8812au -v 4.2.2

You should have luck using the attached drivers for any of the following devices with 150Mbps,300Mbps, 600Mbps, 900Mbps. Both 2.4 & 5GHz and AC300, AC600, AC900, AC1200+. 802.11ac / 802.11b / 802.11g / 802.11c devices should be good.

Be prepared to restart your computer after installing the drivers.

Source: https://rehmann.co/blog/drivers-wifi-usb-adapter-osxmac-linux-windows/

How To Install R on Debian 9

Introduction

R is an open-source programming language that specializes in statistical computing and graphics. Supported by the R Foundation for Statistical Computing, it is widely used for developing statistical software and performing data analysis. An increasingly popular and extensible language with an active community, R offers many user-generated packages for specific areas of study, which makes it applicable to many fields.

In this tutorial, we will install R and show how to add packages from the official Comprehensive R Archive Network (CRAN).

Prerequisites

To follow along with this tutorial, you will need a Debian 9 server with:

  • at least 1GB of RAM
  • a non-root user with sudo privileges

To learn how to achieve this setup, follow our Debian 9 initial server setup guide.

Once these prerequisites are in place, you’re ready to begin.

Step 1 — Installing Dependencies

Because R is a fast-moving project, the latest stable version isn’t always available from Debian’s repositories, so we’ll need to add the external repository maintained by CRAN. In order to do this, we’ll need to install some dependencies for the Debian 9 cloud image.

To perform network operations that manage and download certificates, we need to install dirmngr so that we can add the external repository.

  • sudo apt install dirmngr –install-recommends

To add a PPA reference to Debian, we’ll need to use the add-apt-repository command. For installations where this command may not available, you can add this utility to your system by installing software-properties-common:

  • sudo apt install software-properties-common

Finally, to ensure that we have HTTPS support for secure protocols, we’ll install the following tool:

  • sudo apt install apt-transport-https

With these dependencies in place, we’re ready to install R.

Step 2 — Installing R

For the most recent version of R, we’ll be installing from the CRAN repositories.

Note: CRAN maintains the repositories within their network, but not all external repositories are reliable. Be sure to install only from trusted sources.

Let’s first add the relevant GPG key.

  • sudo apt-key adv –keyserver keys.gnupg.net –recv-key ‘E19F5F87128899B192B1A2C2AD5F960A256A04AF’

When we run the command, we’ll receive the following output:

Output
Executing: /tmp/apt-key-gpghome.k3UoM7WQGq/gpg.1.sh --keyserver keys.gnupg.net --recv-key E19F5F87128899B192B1A2C2AD5F960A256A04AF
gpg: key AD5F960A256A04AF: public key "Johannes Ranke (Wissenschaftlicher Berater) <johannes.ranke@jrwb.de>" imported
gpg: Total number processed: 1
gpg:               imported: 1

Once we have the trusted key, we can add the repository. Note that if you’re not using Debian 9 (Stretch), you can look at the supported R Project Debian branches, named for each release.

  • sudo add-apt-repository ‘deb https://cloud.r-project.org/bin/linux/debian stretch-cran35/’

Now, we’ll need to run update after this in order to include package manifests from the new repository.

  • sudo apt update

Among the output should be a line similar to the following:

Among the output that displays, you should identify lines similar to the following:

Output
...
Get:6 https://cloud.r-project.org/bin/linux/debian stretch-cran35/ InRelease [4,371 B]
Get:7 https://cloud.r-project.org/bin/linux/debian stretch-cran35/ Packages [50.1 kB]
...

If the lines above appear in the output from the update command, we’ve successfully added the repository. We can be sure we won’t accidentally install an older version.

At this point, we’re ready to install R with the following command.

  • sudo apt install r-base

If prompted to confirm installation, press y to continue.

As of the time of writing, the latest stable version of R from CRAN is 3.5.1, which is displayed when you start R.

Since we’re planning to install an example package for every user on the system, we’ll start R as root so that the libraries will be available to all users automatically. Alternatively, if you run the R command without sudo, a personal library can be set up for your user.

  • sudo -i R
Output

R version 3.5.1 (2018-07-02) -- "Feather Spray"
Copyright (C) 2018 The R Foundation for Statistical Computing
Platform: x86_64-pc-linux-gnu (64-bit)
...
Type 'demo()' for some demos, 'help()' for on-line help, or
'help.start()' for an HTML browser interface to help.
Type 'q()' to quit R.

>

This confirms that we’ve successfully installed R and entered its interactive shell.

Step 3 — Installing R Packages from CRAN

Part of R’s strength is its available abundance of add-on packages. For demonstration purposes, we’ll install txtplot, a library that outputs ASCII graphs that include scatterplot, line plot, density plot, acf and bar charts:

  • install.packages(‘txtplot’)

Note: The following output shows where the package will be installed.

Output
...
Installing package into ‘/usr/local/lib/R/site-library’
(as ‘lib’ is unspecified)
. . .

This site-wide path is available because we ran R as root. This is the correct location to make the package available to all users.

When the installation is complete, we can load txtplot:

  • library(‘txtplot’)

If there are no error messages, the library has successfully loaded. Let’s put it in action now with an example which demonstrates a basic plotting function with axis labels. The example data, supplied by R’s datasets package, contains the speed of cars and the distance required to stop based on data from the 1920s:

  • txtplot(cars[,1], cars[,2], xlab = ‘speed’, ylab = ‘distance’)
Output
      +----+-----------+------------+-----------+-----------+--+
  120 +                                                   *    +
      |                                                        |
d 100 +                                                   *    +
i     |                                    *                *  |
s  80 +                          *         *                   +
t     |                                       * *    *    *    |
a  60 +                          *  *      *    *      *       +
n     |                        *         * *  * *              |
c  40 +                *       * *    *  *    * *              +
e     |         *      *  * *  * *  *                          |
   20 +           *    *  * *       *                          +
      |  *      *    *                                         |
    0 +----+-----------+------------+-----------+-----------+--+
           5          10           15          20          25   
                                speed       

If you are interested to learn more about txtplot, use help(txtplot) from within the R interpreter.

Any precompiled package can be installed from CRAN with install.packages(). To learn more about what’s available, you can find a listing of official packages organized by name via the Available CRAN Packages By Name list.

To exit R, you can type q(). Unless you want to save the workspace image, you can press n.

Conclusion

With R successfully installed on your server, you may be interested in this guide on installing the RStudio Server to bring an IDE to the server-based deployment you just completed. You can also learn how to set up a Shiny server to convert your R code into interactive web pages.

For more information on how to install R packages by leveraging different tools, you can read about how to install directly from GitHub, BitBucket or other locations. This will allow you to take advantage of the very latest work from the active community.

source:

  • https://www.digitalocean.com/community/tutorials/how-to-install-r-on-debian-9

How to Change Hostname on Ubuntu 18.04

This tutorial will guide you through the process of changing the hostname on a Ubuntu 18.04 system.

The hostname is set at the time when the Ubuntu operating system is installed or if you are spinning up a virtual machine it is dynamically assigned to the instance at startup.

The method described in this guide will work without the need of restarting your system.

Although this tutorial is written for Ubuntu 18.04 the same steps the same instructions apply for Ubuntu 16.04 and any Ubuntu based distribution, including Linux Mint and Elementary OS.

Before continuing with this tutorial, make sure you are logged in as a user with sudo privileges.

A hostname is a label that identifies a machine on a network. You shouldn’t use the same hostname on two different machines on a same network.

To view the current hostname, enter the following command:

hostnamectl

Copy

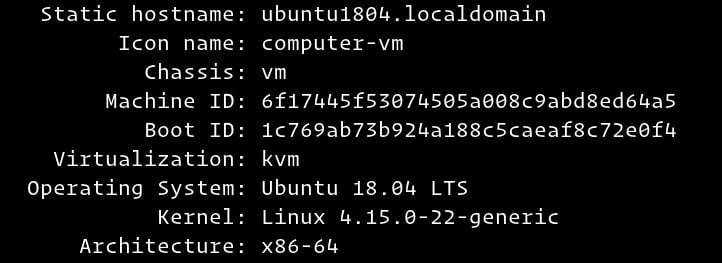
As you can see in the image above, the current hostname is set to ubuntu1804.localdomain.

The following steps outline how to change the hostname in Ubuntu 18.04.

In Ubuntu 18.04 we can change the system hostname and related settings using the command hostnamectl.

For example is we want to change the system static hostname to linuxize, we can use the following command:

sudo hostnamectl set-hostname linuxize

Copy

The hostnamectl command does not produce output. On success, 0 is returned, a non-zero failure code otherwise.

Open the /etc/hosts file and change the old hostname to the new one.

/etc/hosts
127.0.0.1   localhost
127.0.0.1   linuxize

# The following lines are desirable for IPv6 capable hosts
::1     localhost ip6-localhost ip6-loopback
ff02::1 ip6-allnodes
ff02::2 ip6-allrouters

Copy

If the cloud-init package is installed you also need to edit the cloud.cfg file. This package is usually installed by default in the images provided by the cloud providers such as AWS and it is used to handle the initialization of the cloud instances.

To check if the package is installed run the following command:

ls -l /etc/cloud/cloud.cfg

Copy

If you see the following output it means that the package is not installed and no further action is required.

ls: cannot access '/etc/cloud/cloud.cfg': No such file or directory

Copy

If the package is installed the output will look like the following:

-rw-r--r-- 1 root root 3169 Apr 27 09:30 /etc/cloud/cloud.cfg

Copy

In this case you’ll need to open the /etc/cloud/cloud.cfg file:

sudo nano /etc/cloud/cloud.cfg

Copy

Search for preserve_hostname and change the value from false to true:

/etc/cloud/cloud.cfg
# This will cause the set+update hostname module to not operate (if true)
preserve_hostname: true

Copy

Save the file and close your editor.

To verify that the hostname was successfully changed, once again use the hostnamectlcommand:

hostnamectl

Copy

   Static hostname: linuxize
         Icon name: computer-vm
           Chassis: vm
        Machine ID: 6f17445f53074505a008c9abd8ed64a5
           Boot ID: 1c769ab73b924a188c5caeaf8c72e0f4
    Virtualization: kvm
  Operating System: Ubuntu 18.04 LTS
            Kernel: Linux 4.15.0-22-generic
      Architecture: x86-64

Copy

You should see your new server name printed on the console.

In this tutorial we have shown you how to easily change your Ubuntu server hostname without restarting the machine.

Feel free to leave a comment if you have any questions.

Source:

  • https://linuxize.com/post/how-to-change-hostname-on-ubuntu-18-04/

How To Set Up Apache Virtual Hosts on Ubuntu 16.04

Introduction

The Apache web server is the most popular way of serving web content on the internet. It accounts for more than half of all active websites on the internet and is extremely powerful and flexible.

Apache breaks its functionality and components into individual units that can be customized and configured independently. The basic unit that describes an individual site or domain is called a virtual host.

These designations allow the administrator to use one server to host multiple domains or sites off of a single interface or IP by using a matching mechanism. This is relevant to anyone looking to host more than one site off of a single VPS.

Each domain that is configured will direct the visitor to a specific directory holding that site’s information, never indicating that the same server is also responsible for other sites. This scheme is expandable without any software limit as long as your server can handle the load.

In this guide, we will walk you through how to set up Apache virtual hosts on an Ubuntu 16.04 VPS. During this process, you’ll learn how to serve different content to different visitors depending on which domains they are requesting.

Prerequisites

Before you begin this tutorial, you should create a non-root user as described in steps 1-4 here.

You will also need to have Apache installed in order to work through these steps. If you haven’t already done so, you can get Apache installed on your server through apt-get:

  • sudo apt-get update
  • sudo apt-get install apache2

After these steps are complete, we can get started.

For the purposes of this guide, our configuration will make a virtual host for example.com and another for test.com. These will be referenced throughout the guide, but you should substitute your own domains or values while following along.

To learn how to set up your domain names with DigitalOcean, follow this link. If you do not have domains available to play with, you can use dummy values.

We will show how to edit your local hosts file later on to test the configuration if you are using dummy values. This will allow you to test your configuration from your home computer, even though your content won’t be available through the domain name to other visitors.

Step One — Create the Directory Structure

The first step that we are going to take is to make a directory structure that will hold the site data that we will be serving to visitors.

Our document root (the top-level directory that Apache looks at to find content to serve) will be set to individual directories under the /var/www directory. We will create a directory here for both of the virtual hosts we plan on making.

Within each of these directories, we will create a public_html folder that will hold our actual files. This gives us some flexibility in our hosting.

For instance, for our sites, we’re going to make our directories like this:

  • sudo mkdir -p /var/www/example.com/public_html
  • sudo mkdir -p /var/www/test.com/public_html

The portions in red represent the domain names that we are wanting to serve from our VPS.

Step Two — Grant Permissions

Now we have the directory structure for our files, but they are owned by our root user. If we want our regular user to be able to modify files in our web directories, we can change the ownership by doing this:

  • sudo chown -R $USER:$USER /var/www/example.com/public_html
  • sudo chown -R $USER:$USER /var/www/test.com/public_html

The $USER variable will take the value of the user you are currently logged in as when you press Enter. By doing this, our regular user now owns the public_html subdirectories where we will be storing our content.

We should also modify our permissions a little bit to ensure that read access is permitted to the general web directory and all of the files and folders it contains so that pages can be served correctly:

  • sudo chmod -R 755 /var/www

Your web server should now have the permissions it needs to serve content, and your user should be able to create content within the necessary folders.

Step Three — Create Demo Pages for Each Virtual Host

We have our directory structure in place. Let’s create some content to serve.

We’re just going for a demonstration, so our pages will be very simple. We’re just going to make an index.html page for each site.

Let’s start with example.com. We can open up an index.html file in our editor by typing:

  • nano /var/www/example.com/public_html/index.html

In this file, create a simple HTML document that indicates the site it is connected to. My file looks like this:

/var/www/example.com/public_html/index.html
<html>
  <head>
    <title>Welcome to Example.com!</title>
  </head>
  <body>
    <h1>Success!  The example.com virtual host is working!</h1>
  </body>
</html>

Save and close the file when you are finished.

We can copy this file to use as the basis for our second site by typing:

  • cp /var/www/example.com/public_html/index.html /var/www/test.com/public_html/index.html

We can then open the file and modify the relevant pieces of information:

  • nano /var/www/test.com/public_html/index.html
/var/www/test.com/public_html/index.html
<html>
  <head>
    <title>Welcome to Test.com!</title>
  </head>
  <body> <h1>Success!  The test.com virtual host is working!</h1>
  </body>
</html>

Save and close this file as well. You now have the pages necessary to test the virtual host configuration.

Step Four — Create New Virtual Host Files

Virtual host files are the files that specify the actual configuration of our virtual hosts and dictate how the Apache web server will respond to various domain requests.

Apache comes with a default virtual host file called 000-default.conf that we can use as a jumping off point. We are going to copy it over to create a virtual host file for each of our domains.

We will start with one domain, configure it, copy it for our second domain, and then make the few further adjustments needed. The default Ubuntu configuration requires that each virtual host file end in .conf.

Create the First Virtual Host File

Start by copying the file for the first domain:

  • sudo cp /etc/apache2/sites-available/000-default.conf /etc/apache2/sites-available/example.com.conf

Open the new file in your editor with root privileges:

  • sudo nano /etc/apache2/sites-available/example.com.conf

The file will look something like this (I’ve removed the comments here to make the file more approachable):

/etc/apache2/sites-available/example.com.conf
<VirtualHost *:80>
    ServerAdmin webmaster@localhost
    DocumentRoot /var/www/html
    ErrorLog ${APACHE_LOG_DIR}/error.log
    CustomLog ${APACHE_LOG_DIR}/access.log combined
</VirtualHost>

As you can see, there’s not much here. We will customize the items here for our first domain and add some additional directives. This virtual host section matches any requests that are made on port 80, the default HTTP port.

First, we need to change the ServerAdmin directive to an email that the site administrator can receive emails through.

ServerAdmin admin@example.com

After this, we need to add two directives. The first, called ServerName, establishes the base domain that should match for this virtual host definition. This will most likely be your domain. The second, called ServerAlias, defines further names that should match as if they were the base name. This is useful for matching hosts you defined, like www:

ServerName example.com
ServerAlias www.example.com

The only other thing we need to change for a basic virtual host file is the location of the document root for this domain. We already created the directory we need, so we just need to alter the DocumentRootdirective to reflect the directory we created:

DocumentRoot /var/www/example.com/public_html

In total, our virtualhost file should look like this:

/etc/apache2/sites-available/example.com.conf
<VirtualHost *:80>
    ServerAdmin admin@example.com
    ServerName example.com
    ServerAlias www.example.com
    DocumentRoot /var/www/example.com/public_html
    ErrorLog ${APACHE_LOG_DIR}/error.log
    CustomLog ${APACHE_LOG_DIR}/access.log combined
</VirtualHost>

Save and close the file.

Copy First Virtual Host and Customize for Second Domain

Now that we have our first virtual host file established, we can create our second one by copying that file and adjusting it as needed.

Start by copying it:

  • sudo cp /etc/apache2/sites-available/example.com.conf /etc/apache2/sites-available/test.com.conf

Open the new file with root privileges in your editor:

  • sudo nano /etc/apache2/sites-available/test.com.conf

You now need to modify all of the pieces of information to reference your second domain. When you are finished, it may look something like this:

/etc/apache2/sites-available/test.com.conf
<VirtualHost *:80>
    ServerAdmin admin@test.com
    ServerName test.com
    ServerAlias www.test.com
    DocumentRoot /var/www/test.com/public_html
    ErrorLog ${APACHE_LOG_DIR}/error.log
    CustomLog ${APACHE_LOG_DIR}/access.log combined
</VirtualHost>

Save and close the file when you are finished.

Step Five — Enable the New Virtual Host Files

Now that we have created our virtual host files, we must enable them. Apache includes some tools that allow us to do this.

We can use the a2ensite tool to enable each of our sites like this:

  • sudo a2ensite example.com.conf
  • sudo a2ensite test.com.conf

Next, disable the default site defined in 000-default.conf:

  • sudo a2dissite 000-default.conf

When you are finished, you need to restart Apache to make these changes take effect:

  • sudo systemctl restart apache2

In other documentation, you may also see an example using the service command:

  • sudo service apache2 restart

This command will still work, but it may not give the output you’re used to seeing on other systems, since it’s now a wrapper around systemd’s systemctl.

Step Six — Set Up Local Hosts File (Optional)

If you haven’t been using actual domain names that you own to test this procedure and have been using some example domains instead, you can at least test the functionality of this process by temporarily modifying the hosts file on your local computer.

This will intercept any requests for the domains that you configured and point them to your VPS server, just as the DNS system would do if you were using registered domains. This will only work from your computer though, and is simply useful for testing purposes.

Make sure you are operating on your local computer for these steps and not your VPS server. You will need to know the computer’s administrative password or otherwise be a member of the administrative group.

If you are on a Mac or Linux computer, edit your local file with administrative privileges by typing:

  • sudo nano /etc/hosts

If you are on a Windows machine, you can find instructions on altering your hosts file here.

The details that you need to add are the public IP address of your VPS server followed by the domain you want to use to reach that VPS.

For the domains that I used in this guide, assuming that my VPS IP address is 111.111.111.111, I could add the following lines to the bottom of my hosts file:

/etc/hosts
127.0.0.1   localhost
127.0.1.1   guest-desktop
111.111.111.111 example.com
111.111.111.111 test.com

This will direct any requests for example.com and test.com on our computer and send them to our server at 111.111.111.111. This is what we want if we are not actually the owners of these domains in order to test our virtual hosts.

Save and close the file.

Step Seven — Test your Results

Now that you have your virtual hosts configured, you can test your setup easily by going to the domains that you configured in your web browser:

http://example.com

You should see a page that looks like this:

Apache virt host example

Likewise, if you can visit your second page:

http://test.com

You will see the file you created for your second site:

Apache virt host test

If both of these sites work well, you’ve successfully configured two virtual hosts on the same server.

If you adjusted your home computer’s hosts file, you may want to delete the lines you added now that you verified that your configuration works. This will prevent your hosts file from being filled with entries that are not actually necessary.

If you need to access this long term, consider purchasing a domain name for each site you need and setting it up to point to your VPS server.

Conclusion

If you followed along, you should now have a single server handling two separate domain names. You can expand this process by following the steps we outlined above to make additional virtual hosts.

There is no software limit on the number of domain names Apache can handle, so feel free to make as many as your server is capable of handling.

Source:

  • https://www.digitalocean.com/community/tutorials/how-to-set-up-apache-virtual-hosts-on-ubuntu-16-04
 Install PHP in Ubuntu 18.04

To install PHP, run:

$ sudo apt install php libapache2-mod-php php-mysql

After installing PHP, create info.php file in the Apache root document folder. Usually, the apache root document folder will be /var/www/html/ or /var/www/ in most Debian based Linux distributions. In Ubuntu 18.04 LTS, it is /var/www/html/.

Create test.php in the apache root folder as shown below.

$ sudo vi /var/www/html/info.php

Add the following lines:

<?php
phpinfo();
?>

Save and quit the file. Restart apache service to take effect the changes.

$ sudo systemctl restart apache2

Now, open up your web browser and type: http://IP-address/info.php in the address bar.

You will be pleased with a screen like below.

Install PHP modules

To improve the functionality of PHP, you can install some additional PHP modules.

To list the available PHP modules, run:

$ sudo apt-cache search php- | less

Sample output:

Use and arrows to move up and down between the result. To exit from the result, type q.

To find the details of any particular php module, for example php-gd, run:

$ sudo apt-cache show php-gd

To install a php module run:

$ sudo apt install php-gd

To install all modules (not necessary though), run:

$ sudo apt-get install php*

Do not forget to restart Apache service after installing any php module.

Install Apache in Ubuntu 18.04

For the purpose of this tutorial, I will be using the following testbox.

  • Operating System : Ubuntu 18.04 64 bit LTS server
  • IP address : 192.168.225.22/24

Install Apache webserver

To install Apache web server, run the following command from the Terminal:

$ sudo apt install apache2

Check if Apache web server is running or not:

$ sudo systemctl status apache2
● apache2.service - The Apache HTTP Server
Loaded: loaded (/lib/systemd/system/apache2.service; enabled; vendor preset: enabled)
Drop-In: /lib/systemd/system/apache2.service.d
└─apache2-systemd.conf
Active: active (running) since Fri 2018-07-06 11:42:35 UTC; 27s ago
Main PID: 2079 (apache2)
Tasks: 55 (limit: 2322)
CGroup: /system.slice/apache2.service
├─2079 /usr/sbin/apache2 -k start
├─2081 /usr/sbin/apache2 -k start
└─2082 /usr/sbin/apache2 -k start

Jul 06 11:42:35 ubuntuserver systemd[1]: Starting The Apache HTTP Server...
Jul 06 11:42:35 ubuntuserver systemd[1]: Started The Apache HTTP Server.

Apache service is loaded and running!

Adjust firewall to allow Apache web server

By default, the apache web browser can’t be accessed from remote systems if you have enabled the UFW firewall in Ubuntu 18.04 LTS. You must allow the http and https traffic via UFW by following the below steps.

First, let us view which applications have installed a profile using command:

$ sudo ufw app list
Available applications:
Apache
Apache Full
Apache Secure
OpenSSH

As you can see, Apache and OpenSSH applications have installed UFW profiles.

If you look into the “Apache Full” profile, you will see that it enables traffic to the ports 80 and 443:

$ sudo ufw app info "Apache Full"
Profile: Apache Full
Title: Web Server (HTTP,HTTPS)
Description: Apache v2 is the next generation of the omnipresent Apache web
server.

Ports:
80,443/tcp

Now, run the following command to allow incoming HTTP and HTTPS traffic for this profile:

$ sudo ufw allow in "Apache Full"
Rules updated
Rules updated (v6)

If you want to allow https traffic, but only http (80) traffic, run:

$ sudo ufw app info "Apache"

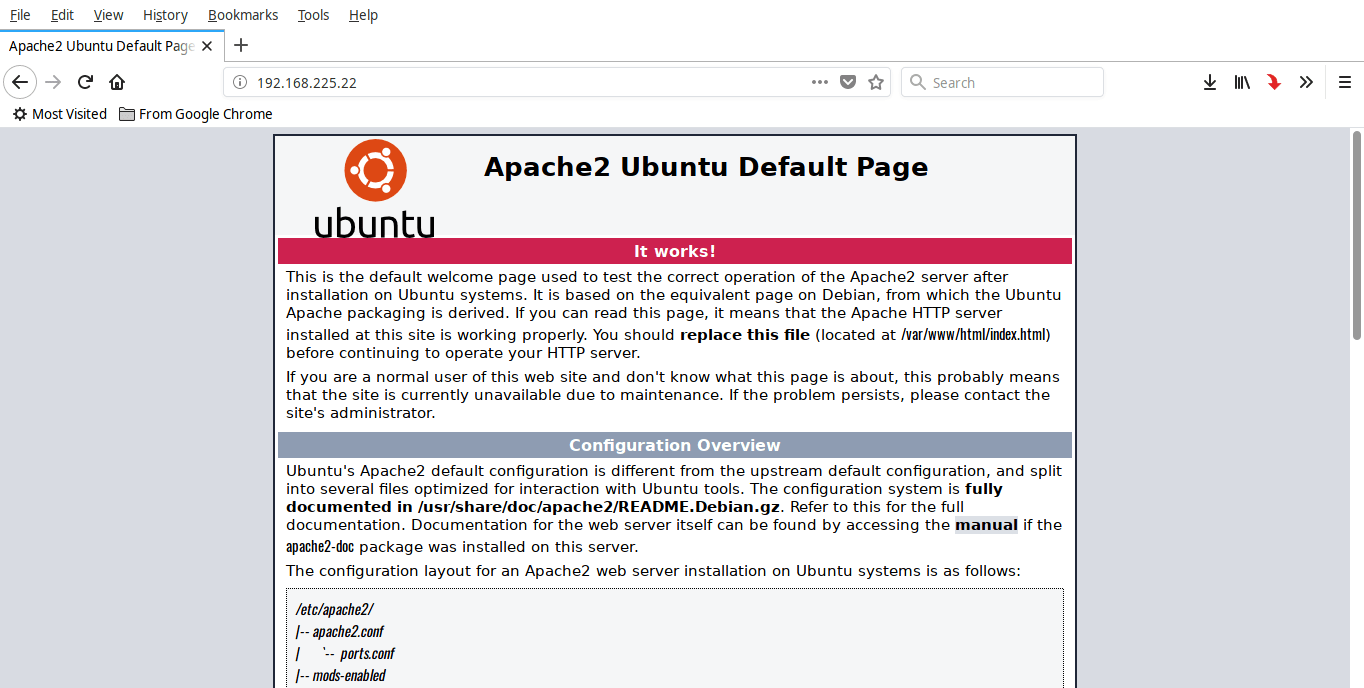
Now, open up your web browser and navigate to http://localhost/ or http://IP-Address/.

If you are see a screen something like above, you are good to go. Apache server is working!

Source:

  • https://www.ostechnix.com/install-apache-mariadb-php-lamp-stack-ubuntu-16-04/

Setting IP Address (Ubuntu 18.04)

Based on this you configuration in .yaml (sudo /etc/netplan/50-xxxx.yaml) can be:

# This file describes the network interfaces available on your system
# For more information, see netplan(5).
network:
  version: 2
  renderer: networkd
  ethernets:
    ens3:
      dhcp4: no
      dhcp6: no
      addresses: [192.168.0.97/25]
      gateway4: 192.168.0.1
      nameservers:
        addresses: [8.8.8.8,8.8.4.4]

Or some appropriate netmask.

Netmask cannot be 255.255.255.1. Netmask for class C addresses can be:

Prefix size         | Subnet mask   
/24                 | 255.255.255.0 
/25                 | 255.255.255.128
/26                 | 255.255.255.192
/27                 | 255.255.255.224
/28                 | 255.255.255.240
/29                 | 255.255.255.248
/30                 | 255.255.255.252
# sudo netplan apply

How To Install R on Ubuntu 18.04

Introduction

R is an open-source programming language that specializes in statistical computing and graphics. In this tutorial, we will install R on an Ubuntu 18.04 server.

For a more detailed version of this tutorial, with better explanations of each step, please refer to How To Install R on Ubuntu 18.04.

Step 1 — Add GPG Key

The Ubuntu archives on CRAN are signed with the key of “Michael Rutter ” with key ID 0x51716619e084dab9. To add the key to your system with one command use (thanks to Brett Presnell for the tip):

sudo apt-key adv --keyserver keyserver.ubuntu.com --recv-keys E298A3A825C0D65DFD57CBB651716619E084DAB9

An alternate method can be used by retrieving the key with

gpg --keyserver keyserver.ubuntu.com --recv-key E298A3A825C0D65DFD57CBB651716619E084DAB9

and then feed it to apt-key with

gpg -a --export E298A3A825C0D65DFD57CBB651716619E084DAB9 | sudo apt-key add -

Some people have reported difficulties using this approach. The issue is usually related to a firewall blocking port 11371. If the first gpg command fails, you may want to try (thanks to Mischan Toosarani for the tip):

gpg --keyserver hkp://keyserver.ubuntu.com:80 --recv-keys E298A3A825C0D65DFD57CBB651716619E084DAB9

and then feed it to apt-key with

gpg -a --export E298A3A825C0D65DFD57CBB651716619E084DAB9 | sudo apt-key add -

Another alternative approach is to search for the key at http://keyserver.ubuntu.com:11371/ and copy the key to a plain text file, say key.txt. Then, feed the key to apt-key with

sudo apt-key add key.txt

Step 2 — Add the R Repository

To obtain the latest R 4.0 packages, add an entry like

deb https://cloud.r-project.org/bin/linux/ubuntu focal-cran40/

or

deb https://cloud.r-project.org/bin/linux/ubuntu bionic-cran40/

or

deb https://cloud.r-project.org/bin/linux/ubuntu xenial-cran40/

Step 3 — Update Package Lists

  • sudo apt update

Step 4 — Install R

  • sudo apt install r-base r-base-dev

If prompted to confirm installation, press y to continue.

Step 5 — Test Install

Start R’s interactive shell as root.

  • sudo -i R

You should receive output similar to the following:

Output

R version 3.5.1 (2018-07-02) -- "Feather Spray"
Copyright (C) 2018 The R Foundation for Statistical Computing
Platform: x86_64-pc-linux-gnu (64-bit)
...
Type 'demo()' for some demos, 'help()' for on-line help, or
'help.start()' for an HTML browser interface to help.
Type 'q()' to quit R.

>

This confirms that we’ve successfully installed R and entered its interactive shell.

Source:

  • https://www.digitalocean.com/community/tutorials/how-to-install-r-on-ubuntu-18-04-quickstart

Installing MariaDB on Ubuntu 18.04 from the MariaDB Repositories

At the time of writing this article, the latest version of MariaDB available from the official MariaDB repositories is MariaDB version 10.3. Before continuing with the next step you should visit the MariaDB Repository page and check if there is a new version available.

To install MariaDB 10.3 on your Ubuntu 18.04 server perform the following steps:

  1. First add the MariaDB GPG key to your system using the following command:
    sudo apt-key adv --recv-keys --keyserver hkp://keyserver.ubuntu.com:80 0xF1656F24C74CD1D8

    Copy

  2. Once the key is imported, add the MariaDB repository with:
    sudo add-apt-repository 'deb [arch=amd64,arm64,ppc64el] http://ftp.utexas.edu/mariadb/repo/10.3/ubuntu bionic main'

    Copy

    If you get an error message saying add-apt-repository command not found install the software-properties-common package.

  3. To be able to install packages from the MariaDB repository you’ll need to update the packages list:
    sudo apt update

    Copy

  4. Now that the repository is added install the MariaDB package with:
    sudo apt install mariadb-server

    Copy

  5. The MariaDB service will start automatically, to verify it type:
    sudo systemctl status mariadb

    Copy

    ● mariadb.service - MariaDB 10.3.8 database server
    Loaded: loaded (/lib/systemd/system/mariadb.service; enabled; vendor preset: enabled)
    Drop-In: /etc/systemd/system/mariadb.service.d
            └─migrated-from-my.cnf-settings.conf
    Active: active (running) since Sun 2018-07-29 19:36:30 UTC; 56s ago
        Docs: man:mysqld(8)
            https://mariadb.com/kb/en/library/systemd/
    Main PID: 16417 (mysqld)
    Status: "Taking your SQL requests now..."
        Tasks: 31 (limit: 507)
    CGroup: /system.slice/mariadb.service
            └─16417 /usr/sbin/mysqld

    Copy

    And print the MariaDB server version, with:

    mysql -V

    Copy

    mysql  Ver 15.1 Distrib 10.3.8-MariaDB, for debian-linux-gnu (x86_64) using readline 5.2

    Copy

Run the mysql_secure_installation command to improve the security of the MariaDB installation:

sudo mysql_secure_installation

Copy

The script will prompt you to set up the root user password, remove the anonymous user, restrict root user access to the local machine and remove the test database. At the end the script will reload the privilege tables ensuring that all changes take effect immediately.

All steps are explained in detail and it is recommended to answer “Y” (yes) to all questions.

To connect to the MariaDB server through the terminal we can use the MariaDB client.

To log in to the MariaDB server as the root user type:

mysql -u root -p

Copy

You will be prompted to enter the root password you have previously set when the mysql_secure_installation script was run.

Once you enter the password you will be presented with the MariaDB shell as shown below:

Welcome to the MariaDB monitor.  Commands end with ; or \g.
Your MariaDB connection id is 49
Server version: 10.1.29-MariaDB-6 Ubuntu 18.04

Copyright (c) 2000, 2017, Oracle, MariaDB Corporation Ab and others.

Type 'help;' or '\h' for help. Type '\c' to clear the current input statement.

Fix MariaDB Plugin ‘Unix_socket’ Is Not Loaded Error On Ubuntu 18.04

Step 1: Add Unix Authentication Plugin To MariaDB Config

If this issue relates to Unix authentication plugin, the quickest fix is to open MariaDB configuration file and add a single line into the file and save. Run the commands below to open MariaDB default configuration file.

sudo nano /etc/mysql/mariadb.conf.d/50-server.cnf

Then add the line below [mysqld] section.

plugin-load-add = auth_socket.so

After adding the line into the file, run the commands below to restart MariaDB

sudo systemctl restart mariadb.service

Next, try to sign  on to the database again.

sudo mysql -u root

Running the commands above should logon onto the database without password prompt… that’s because it’s using unix socket authentication.

Step 2: Change To Standard Authentication

Step 1 should be enough to get you into MariaDB server… and should work as long as you keep using unix socket authentication. However, other apps and services like phpMyAdmin that depend on standard password authentication will stop working when you enable socket authentication for the root user.

A typical error you’ll get when unix socket authentication is being used will be  ERROR 1698 (28000): Access denied for user ‘root’@’localhost’

So now that you’ve access to the database, run the commands below to disable unix socket authentication for the root user…

use mysql;
update user set plugin='' where User='root';
flush privileges;
exit

Exit out and you’re done. Now you should be able to logon to the server with standard password authentication.

That’s it!

Source:

  • https://linuxize.com/post/how-to-install-mariadb-on-ubuntu-18-04/
  • https://websiteforstudents.com/fix-mariadb-plugin-unix_socket-is-not-loaded-error-on-ubuntu-17-04-17-10/
December 2024
M T W T F S S
 1
2345678
9101112131415
16171819202122
23242526272829
3031  

Categories