This tutorial will guide you through the process of changing the hostname on a Ubuntu 18.04 system.
The hostname is set at the time when the Ubuntu operating system is installed or if you are spinning up a virtual machine it is dynamically assigned to the instance at startup.
The method described in this guide will work without the need of restarting your system.
Although this tutorial is written for Ubuntu 18.04 the same steps the same instructions apply for Ubuntu 16.04 and any Ubuntu based distribution, including Linux Mint and Elementary OS.
Prerequisites
Before continuing with this tutorial, make sure you are logged in as a user with sudo privileges.
A hostname is a label that identifies a machine on a network. You shouldn’t use the same hostname on two different machines on a same network.
Display the Current Hostname
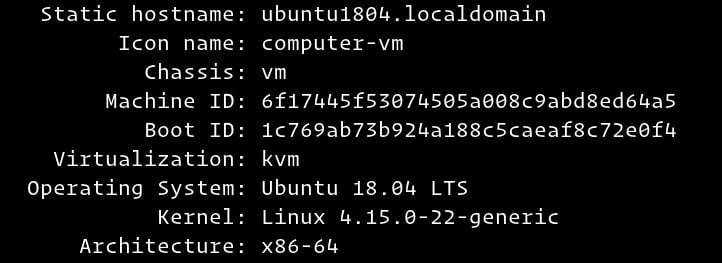
To view the current hostname, enter the following command:
hostnamectl

As you can see in the image above, the current hostname is set to ubuntu1804.localdomain.
The following steps outline how to change the hostname in Ubuntu 18.04.
1. Change the hostname using hostnamectl.
In Ubuntu 18.04 we can change the system hostname and related settings using the command hostnamectl.
For example is we want to change the system static hostname to linuxize, we can use the following command:
sudo hostnamectl set-hostname linuxize
The hostnamectl command does not produce output. On success, 0 is returned, a non-zero failure code otherwise.
2. Edit the /etc/hosts file.
Open the /etc/hosts file and change the old hostname to the new one.
127.0.0.1   localhost
127.0.0.1   linuxize

# The following lines are desirable for IPv6 capable hosts
::1     localhost ip6-localhost ip6-loopback
ff02::1 ip6-allnodes
ff02::2 ip6-allrouters
3. Edit the cloud.cfg file.
If the cloud-init package is installed you also need to edit the cloud.cfg file. This package is usually installed by default in the images provided by the cloud providers such as AWS and it is used to handle the initialization of the cloud instances.
To check if the package is installed run the following command:
ls -l /etc/cloud/cloud.cfg
If you see the following output it means that the package is not installed and no further action is required.
ls: cannot access '/etc/cloud/cloud.cfg': No such file or directory
If the package is installed the output will look like the following:
-rw-r--r-- 1 root root 3169 Apr 27 09:30 /etc/cloud/cloud.cfg
In this case you’ll need to open the /etc/cloud/cloud.cfg file:
sudo nano /etc/cloud/cloud.cfg
Search for preserve_hostname and change the value from false to true:
# This will cause the set+update hostname module to not operate (if true)
preserve_hostname: true
Save the file and close your editor.
Verify the change
To verify that the hostname was successfully changed, once again use the hostnamectlcommand:
hostnamectl
   Static hostname: linuxize
         Icon name: computer-vm
           Chassis: vm
        Machine ID: 6f17445f53074505a008c9abd8ed64a5
           Boot ID: 1c769ab73b924a188c5caeaf8c72e0f4
    Virtualization: kvm
  Operating System: Ubuntu 18.04 LTS
            Kernel: Linux 4.15.0-22-generic
      Architecture: x86-64
You should see your new server name printed on the console.
Conclusion
In this tutorial we have shown you how to easily change your Ubuntu server hostname without restarting the machine.
Feel free to leave a comment if you have any questions.
Source:
- https://linuxize.com/post/how-to-change-hostname-on-ubuntu-18-04/